MultiPlanar UNet: For 3-D Segmentation Tasks - Low Code
Struggling with limited data for 3D medical image segmentation? Try MultiPlanar UNet! Achieved >0.80 dice score on a small knee MRI dataset.

After beginning my Ph.D., the first real-world medical image segmentation project I encountered involved knee MRI segmentation. I had only 39 labeled MRI images for training and validation and 20 labeled images for a final test set. Moreover, my supervisor added:
“There are almost 200 unlabeled images on which our segmentation model will be tested”
After meeting, I sat at my table and thought, what should I do now 😧 ? 39 images are very less, so I did what everyone does: I started with UNet to establish a baseline result. After experimenting with a simple 3D UNet and fine-tuning the hyperparameters through several training iterations, the validation dice score peaked at 0.65. Other UNet variants, like Res UNet and Attention UNet, failed to match the performance of the simple 3D UNet, primarily because complex models require more data to be effective and are quite ineffective with such limited datasets.
In the next face-to-face meeting, I showed those results to my supervisor, and he smiled at them and asked me to look at MPUNet (Multi-planner UNet), an advanced version of UNet for 3d medical image segmentation. This amazing library was created by: Mathias Perslev, Erik Dam, Akshay Pai, and Christian Igel. if you want to know more about this, please take a look at here: https://doi.org/10.1007/978-3-030-32245-8_4.
After struggling a bit (maybe a lot 😅) with installation (because it requires a specific version of Python and tensorflow), it finally worked. I was amazed to see the dice score on the final test was more than 0.80 😎. The paper is still in the analysis stage, I will share it once it is published. So if you have less data and struggling with getting a good dice score, then here is an amazing method and plan of attack for you also, this time, you won’t have to spend hours for the installation and make it work. :)
Plan of Attack
- MultiPlanar UNet working.
- How to install the library?
- How to use it?
MultiPlanar UNet working:
Before applying the MPUNet, let’s learn it working. MPUNet has 3 primary parts:
Data Generation:
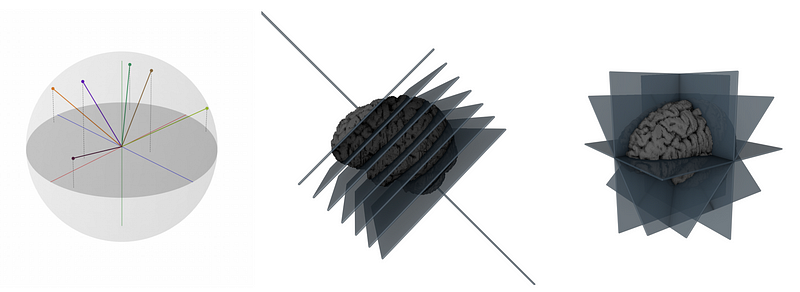
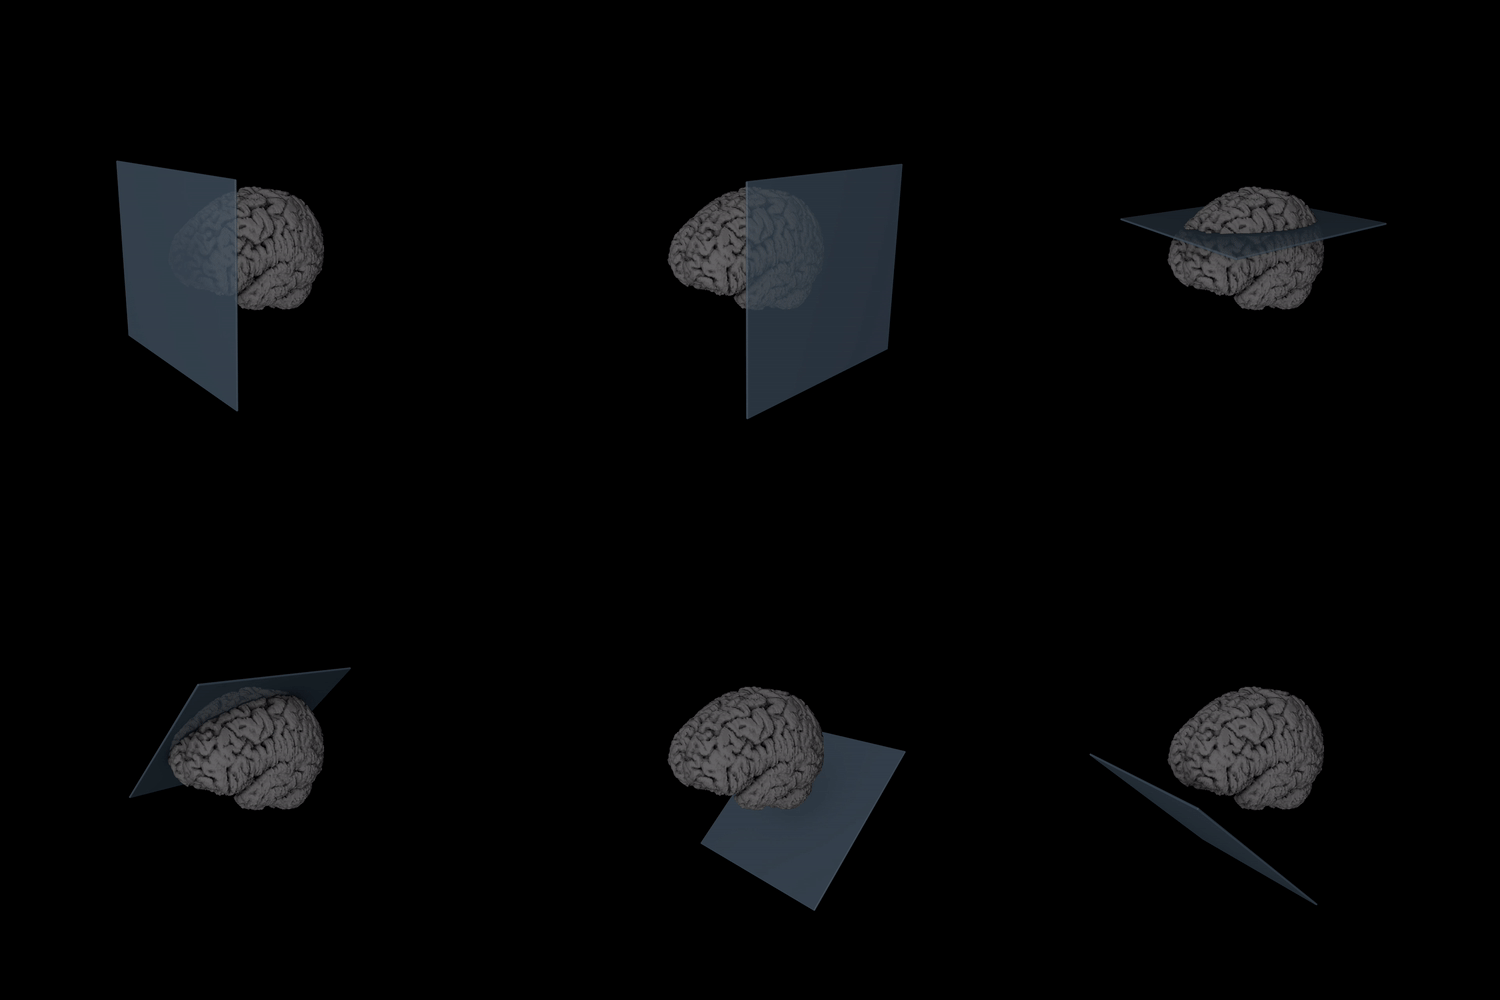
MPUNet takes a 3D medical image, such as an MRI scan, and looks at it from different angles. By doing this, it creates multiple 2D image ‘slices’ from the single 3D image (as shown in figure 1 and 2, both of them shows the same thing).

2d UNet:
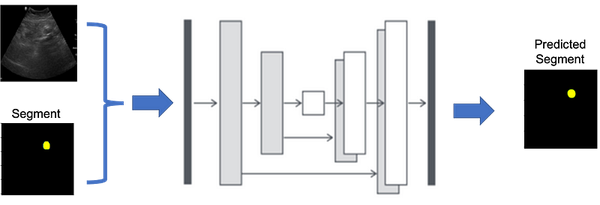
The 2D UNet is a deep learning model designed like a “U” for segmenting images, which is particularly useful in biomedical cases. It has two main parts: a contracting path (called encoder )to capture context and an expansive path (called decoder) to enable precise localization (see Figure 3).

Fusion Model:
The fusion model in a MultiPlanar UNet takes the different guesses made by the initial model about a 3D medical image and combines them into a better, single prediction. This step happens after the first round of predictions and helps to make the final result more accurate. Figure 3 shows the complete working architecture of MPUNet.

How to install?
Here are the steps to install mpunet:
Step 1: make an environment and activate it.
conda create -n myenv python=3.7conda activate myenvStep 2: clone the git repo:
git clone https://github.com/sumit-ai-ml/MultiPlanarUNet.gitStep 3: install mpunet:
pip install -e MultiPlanarUNetHow to use?
step 1: Data Preprocessing:
The dataset should be divided into 3 parts like this:
./data_folder/
|- train/
|--- images/
|------ image1.nii.gz
|------ image5.nii.gz
|--- labels/
|------ image1.nii.gz
|------ image5.nii.gz
|- val/
|--- images/
|--- labels/
|- test/
|--- images/
|--- labels/
|- aug/ <-- OPTIONAL
|--- images/
|--- labels/
Please make sure:
1. The name of image and mask should be same.
2. The image and mask format should be either .nii.gz or .nii3. Also make sure Images should be arrays of dimension 4 with the first 3 corresponding to the image dimensions and the last the channels dimension (e.g. [256, 256, 256, 3] for a 256x256x256 image with 3 channels).
4. Label maps should be identically shaped in the first 3 dimensions and have a single channel (e.g. [256, 256, 256, 1])
Step 2: Initialize the project:
- Make sure you are in the same directory in which the
data_folderthe directory is, then run this command: mp init_project --name my_project --data_dir ./data_folder
Step 3: Training:
- After running above command you will see another directory with
data_foldernamed:my_project. Now run this command to inside themy_projectfolder to initialise the training: mp train --num_GPUs=2 # Any number of GPUs (or 0)- After this completes, run this command:
mp train_fusion --num_GPUs=2- The trained model can now be evaluated on the testing data in data_folder/test by invoking:
mp predict --num_GPUs=2 --out_dir predictions
Reference
Mathias Perslev, Erik Dam, Akshay Pai, and Christian Igel. One Network To Segment Them All: A General, Lightweight System for Accurate 3D Medical Image Segmentation. In: Medical Image Computing and Computer Assisted Intervention (MICCAI), 2019
Pre-print version: https://arxiv.org/abs/1911.01764
Published version: https://doi.org/10.1007/978-3-030-32245-8_4#
Done !!!! Congratulations :) Now, you can perform segmentation on any 3-D medical imaging dataset.
If you enjoyed this article, I’d appreciate your applause, shares, and a follow — it’s a great encouragement for me to create more content :)


