Pytorch Tutorial Part 1: Dataset and Dataloader
Explore image classification and segmentation with PyTorch, covering dataset setup and data loaders in this beginner-friendly guide.

I was initially a big fan of TensorFlow 2.0, particularly because of its integration with Keras, which made building neural networks straightforward and user-friendly. However, as TensorFlow's popularity began to wane and Google's support seemed to diminish, I felt disheartened and decided to switch to PyTorch.
Many experts praise PyTorch for its dynamic computational graph and greater flexibility compared to TensorFlow. PyTorch's dynamic nature allows for more intuitive and interactive model development, which can be beneficial for research and experimentation. However, for lazy person like me who prefers simplicity and ease of use, this flexibility came with a lot of painful efforts.
In this article we will explore first two steps of image classification and segmentation tasks:
- Define Datasets
- Dataloader
Of course, the first step is to install and import the necessary libraries. Let's start with that.
pip install torch torchvision pandas pillow
Now import libraries:
import os
import pandas as pd
from PIL import Image
from torchvision import transforms
from torch.utils.data import Dataset, DataLoader
Define Dataset
There are two methods to organize data:
Method 1
Make folder in the name of every label and save the respected images there. For example you have 2 classes CAT and DOG, so inside Train and Test folder, you will make two folders naming CAT and DOG and put the images of cats and dogs inside the folder. As shown here:
Train
|--CAT - images_1, images_2  ........etc
|--DOG - images_1, images_2 ........etc
Test
|--CAT - images_1, images_2 ........etc
|--DOG - images_1, images_2 ........etc
transform = transforms.Compose([
    transforms.Resize((128, 128)),
    transforms.ToTensor()
])

train_dataset = datasets.ImageFolder(root='train', transform=transform)
test_dataset = datasets.ImageFolder(root='test', transform=transform)
Method 2
This method is used quite well among Deep Learning practitioners and easy to develop, here we will talk about two methods as an example.
For image classification
Save Images in a folder and you have 2 .csv files in which you have image's name in first column and their labels in second column, as shown here:
Train - images_1, images_2 ........etc
Test - images_1, images_2 ........etc
Train.csv
Test.csv
class ImageDataset(Dataset):
def __init__(self, csv_file, root_dir, transform=None):
self.labels_df = pd.read_csv(csv_file)
self.root_dir = root_dir
self.transform = transform
def __len__(self):
return len(self.labels_df)
def __getitem__(self, idx):
img_name = os.path.join(self.root_dir, self.labels_df.iloc[idx, 0])
image = Image.open(img_name)
label = self.labels_df.iloc[idx, 1]
if self.transform:
image = self.transform(image)
return image, label
# train and test dataset
train_dataset = ImageDataset(csv_file='train_labels.csv', root_dir='train', transform=transform)
test_dataset = ImageDataset(csv_file='test_labels.csv', root_dir='test', transform=transform)
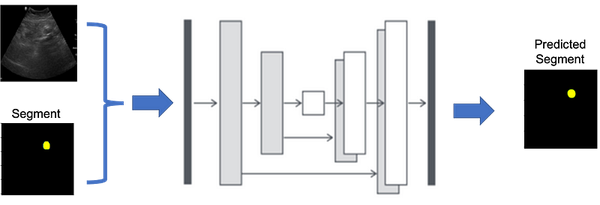
For Segmentation
For Segmentation the data structure should be same. But there will be some changes according to the given data structure:
Train
|--Image - images_1, images_2  ........etc
|--mask - images_1, images_2 ........etc
Test
|--Image - images_1, images_2 ........etc
|--mask - images_1, images_2 ........etc
import os
from PIL import Image
from torch.utils.data import Dataset
import pandas as pd
class ImageDataset(Dataset):
def __init__(self, image_dir, mask_dir, transform=None):
self.image_dir = image_dir
self.mask_dir = mask_dir
self.transform = transform
self.image_names = sorted(os.listdir(image_dir))
def __len__(self):
return len(self.image_names)
def __getitem__(self, idx):
img_name = os.path.join(self.image_dir, self.image_names[idx])
mask_name = os.path.join(self.mask_dir, self.image_names[idx])
image = Image.open(img_name)
mask = Image.open(mask_name)
if self.transform:
image = self.transform(image)
mask = self.transform(mask)
return image, mask
# Example usage
from torchvision import transforms
transform = transforms.Compose([
transforms.Resize((256, 256)),
transforms.ToTensor(),
])
# train and test dataset
train_image_dir = 'Train/Image'
train_mask_dir = 'Train/mask'
test_image_dir = 'Test/Image'
test_mask_dir = 'Test/mask'
train_dataset = ImageDataset(image_dir=train_image_dir, mask_dir=train_mask_dir, transform=transform)
test_dataset = ImageDataset(image_dir=test_image_dir, mask_dir=test_mask_dir, transform=transform)
Pros and cons of both methods
Here are the pros and cons of both methods:
Method 1
Pros: The code is short and straightforward to implement. It is easy to write for a small number of classes.
Cons: For a larger number of classes, such as in datasets with 100 or more classes, it becomes more difficult to divide the data properly. As per my knowledge there is no inbuilt dataset class for segmentation dataset.
Method 2
Pros: For a larger number of classes, such as in datasets with 100 or more classes, it is easy to write.
Cons: The code can be a bit complicated to write.
Dataloader
Dataloader is very simple, just call the dataset inside the dataloader function.
train_loader = DataLoader(train_dataset, batch_size=32, shuffle=True)
test_loader = DataLoader(test_dataset, batch_size=32, shuffle=False)
That's it, in next tutorial we will talk about model and training. See you soon 😄


